Water around an aluminum door often starts off as a tiny stain on the inside sill, but after heavy rain, it can turn into a steady drip or even a small stream crossing the floor. When it comes to fixing leaks in aluminum doors, the main focus is on finding where the water is actually getting in — not just trying to hide the stain.
Skilled technicians will carefully inspect the door frame, threshold, seals, drainage systems, and where the wall connects. If things aren’t obvious, they might use moisture meters or even do some controlled hose testing to track down the real problem. It’s all about figuring out whether the issue is a failed sealant, a blocked drainage channel, or something installed incorrectly.
Now, when it comes to Aluminum Honeycomb Doors, those need a little extra love because their lightweight core can get damaged if water hangs around the edges. Any repair plan should take into account the door’s design, how exposed it is to the elements, and the condition of the surrounding wall.
A good repair involves more than just slapping on some sealant. It means removing any loose or broken stuff, drying out trapped moisture, fixing gaps, and then using weatherproof materials that play nicely with the existing ones. Small things matter — a wonky seal bead can send water right back inside, and rushing a fix might keep things looking good for a week or two, but then the leak comes back during the next storm. Trust me, paying attention to those details is key.
Fixing water leaks around aluminum doors isn’t just about sealing things up; it’s about making sure the entire entry system performs well under weather, regular use, and even some normal building shifts.
When professionals handle it, they document everything — photos, moisture readings, materials used, and follow-up notes. They’ll explain what’s been confirmed and what still needs more checking. Being honest about the process helps everyone make smarter decisions and avoid going through the same repairs over and over.
In the end, a properly treated water leak means your door stays dry through changing weather, everyday traffic, and natural building movements. When the source is truly handled right, that dry threshold is proof that the job was done properly and everything’s in good shape.
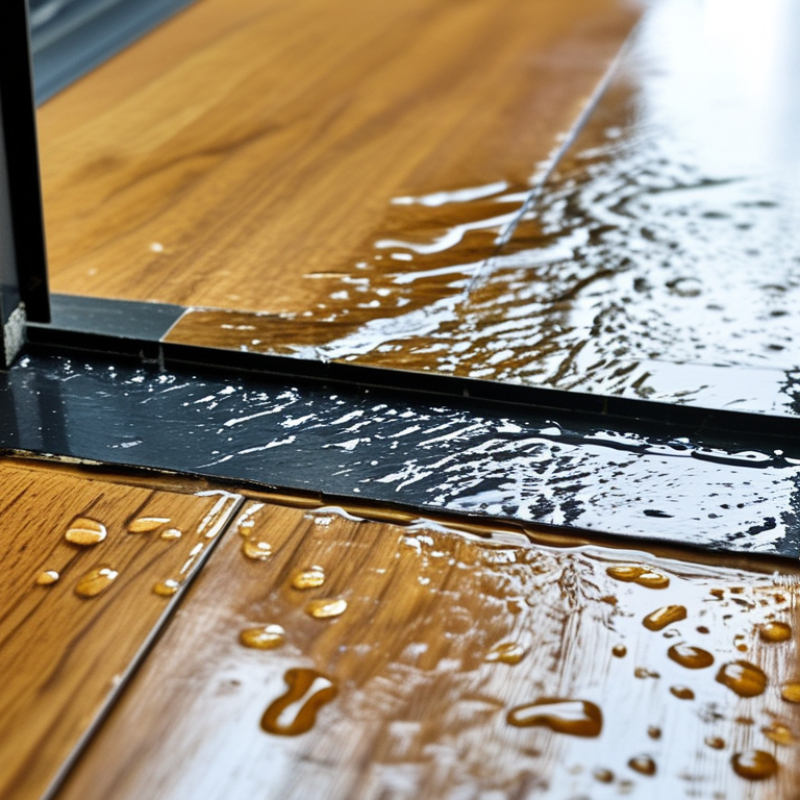
Water leakage around an aluminum door rarely begins with a dramatic drip. It often starts as a damp corner, a faint stain, or swollen flooring near the threshold. During site inspections, I usually check the door frame, weather seals, drainage paths, and surrounding wall joints. Small gaps can direct rainwater behind the frame. That hidden moisture may damage insulation and create unpleasant odors.
A blocked sill channel is a frequent cause. Dust, leaves, and construction debris can stop water from draining outside. Worn gaskets may also flatten and lose contact with the panel. On an Aluminum Pivot Door, incorrect adjustment can leave uneven pressure around the seal. Wind-driven rain then enters through the weakest point. Check for loose fasteners, cracked sealant, rusty hardware, and water marks after heavy rain. These signs deserve attention.
Repair work should match the actual source. Clean drainage slots carefully, replace hardened seals, and renew failed exterior sealant with a compatible product. A technician should also inspect the threshold slope and frame alignment. Simply adding more sealant may hide the problem for a short time. It can even trap moisture behind the joint. I have seen this quick fix fail because the original drainage defect remained. A controlled hose test can confirm whether the repair works, but testing too aggressively may create misleading results.
Begin outside, after rainfall if possible. Check the threshold, corner joints, glazing edges, and frame-to-wall seal. Look for dark streaks, bubbled paint, soft flooring, or white mineral deposits. These clues often reveal a hidden path. Run a dry tissue along the interior frame while an assistant sprays low-pressure water outside. Start at the sill, then move upward. Never use a pressure washer. It can force water past sound seals.
Inspect the drainage route carefully. Many aluminum doors depend on weep openings beneath the sill. Clear blocked openings with a plastic probe, not metal wire. Examine weatherstripping for flattening, gaps, or hardened edges. Measure the door reveal with a feeler gauge; uneven gaps may indicate hinge sag or frame movement. ASTM E1105 describes controlled water-penetration testing, while field guidance from the Fenestration and Glazing Industry Alliance emphasizes checking joints, flashing, and drainage. The U.S. Department of Energy estimates air leakage can account for 25% to 40% of heating and cooling energy use, so a failed door seal may affect comfort as well as moisture control.
Do not seal every visible gap immediately. That is a common mistake. Water may need an exit path. Repair loose fasteners, replace compressed seals, and renew failed perimeter sealant with a compatible exterior-grade product. If water appears above the frame, inspect the head flashing and wall cladding before blaming the door. My inspection notes are sometimes incomplete after one visit, especially when rain is light. A second test often changes the diagnosis.
Water often enters through small failures around an aluminum door. I have found cracked corner seals, flattened gaskets, and loose weatherstripping during routine inspections. Look for damp flooring, dark stains, or a cold draft near the threshold. These signs usually appear before serious frame damage develops.
Start by cleaning the seal channel with mild soap and a soft brush. Remove brittle rubber carefully, without scratching the aluminum surface. Measure the original gasket before buying a replacement. An Aluminum Entry Door Supplier may provide suitable profiles, but the dimensions must still be verified onsite. A gasket that is slightly too thick can prevent the door from closing properly.
Check the corners closely. Poorly joined weatherstripping often leaves narrow openings where rainwater collects. Cut replacement strips with sharp scissors and keep the joints tight. Press the material evenly into its channel. Do not stretch rubber during installation. It may shrink later and reopen the leak. I have made that mistake before.
Inspect the threshold seal after fitting the door gasket. Replace warped or compressed sections, and confirm that the door remains aligned. A small adjustment to the hinges may improve contact pressure. Test the repair with a gentle spray, not a powerful hose. If water still appears, the frame may need professional assessment. Repair work is rarely perfect on the first attempt.
Water stains around an aluminum door rarely identify the exact leak point. Begin with a dry inspection after rainfall. Check the head, sill, vertical frame joints, and fastener holes. Look for darkened sealant, lifted corners, or fine cracks beside screws. A simple hose test can help, but use gentle water from the lowest area upward. Do not spray directly into drainage openings.
Remove loose sealant completely with a plastic scraper. Clean the aluminum and allow it to dry fully. Apply compatible exterior-grade sealant along frame joints and corner connections. For wider gaps, insert a backer rod before sealing. This controls sealant depth and reduces future cracking. Keep weep holes open. Blocking them can trap water inside the frame.
Fastener holes need careful attention. Replace corroded screws with suitable coated fasteners, then seal around each head without covering drainage routes. An Aluminum Entry Door Wholesaler should provide frame details and recommended sealant compatibility when repair conditions are unclear. I once treated only the visible crack, and water returned through a hidden joint. That mistake taught me to test every repaired section again. The finish looked neat, but the leak was not solved. Allow curing time before exposing the door to heavy rain. Inspect the seal after several temperature changes, because aluminum expands and contracts noticeably.
Top Aluminum Door Water Leakage Repair Solutions
Fixing Drainage Channels, Thresholds, and Flashing
Water around an aluminum door often starts with a blocked drainage channel. During inspections, I remove dirt, paint flakes, and compacted insects from the sill track. A soft brush and narrow plastic pick work better than sharp metal tools. Metal tools can deform small outlet openings. After cleaning, I pour a small cup of water into the channel. Water should exit outdoors, not collect near the interior seal. Never seal over a drainage hole. That mistake traps water inside the frame.
The threshold also needs close attention. Check whether it slopes slightly toward the exterior. Loose screws, crushed gaskets, or a warped sill can redirect runoff inward. I replace damaged seals with the correct profile and tighten fasteners evenly. Excessive force can bend aluminum. It happened on one repair I supervised, and the new leak took longer to diagnose. Allow the sealant to cure fully before testing the door again.
Flashing protects the joint between the frame and surrounding wall. Inspect the top edge, side returns, and lower corners for gaps or lifted sections. Remove failed sealant carefully, dry the surfaces, and apply compatible exterior-grade sealant where needed. Flashing should shed water outward, not create a pocket behind the frame. A hose test from above can reveal the entry point, but use gentle flow. Heavy spray may hide the real drainage problem. When leakage continues, inspect the wall cavity and installation alignment rather than adding another surface bead.
| Leakage Area | Typical Symptoms | Likely Cause | Recommended Repair Solution | Key Materials | Difficulty | Typical Service Time | Verification Method |
|---|---|---|---|---|---|---|---|
| Clogged drainage channels | Water remains in the sill, overflows onto the interior floor, or appears after moderate rain. | Dust, insects, paint, sealant, or construction debris blocking the weep openings. | Remove debris, clear the internal channel with a non-damaging tool, and flush with clean water. Do not seal over the drainage openings. | Soft brush, plastic probe, clean water, wet/dry vacuum, replacement drain covers if damaged. | Low | 30–60 minutes | Pour a small amount of water into the sill channel and confirm that it exits outdoors without backing up. |
| Damaged or undersized weep holes | The channel is clean, but water drains slowly or spills over during heavy rainfall. | Weep openings are obstructed, too small, incorrectly positioned, or covered by sealant. | Restore the original drainage path or replace damaged drain components in accordance with the door system design. Avoid drilling without confirming the internal profile. | Replacement drainage components, plastic cleaning tools, corrosion-resistant fasteners, compatible sealant where specified. | Medium | 1–3 hours | Conduct a controlled hose test and check that water exits through the designed outlets rather than through the interior frame joint. |
| Loose or uneven threshold | Water enters beneath the door, especially near corners or where the threshold flexes under foot traffic. | Missing fasteners, inadequate support, settlement, or an incorrect threshold slope. | Remove loose sections, correct the supporting surface, reinstall with appropriate fasteners, and maintain a continuous exterior fall away from the room. | Shims, corrosion-resistant screws, packers, compatible sealant, level, replacement threshold parts if required. | Medium | 2–4 hours | Check threshold stability and use a level to confirm that water is directed toward the exterior drainage path. |
| Failed threshold seal | A narrow water line appears at the threshold joint or at the intersection with the jambs. | Aged, cracked, poorly bonded, or incompatible sealant; dirt or moisture prevented proper adhesion. | Cut out failed sealant completely, clean and dry the joint, apply compatible sealant, and tool the bead to shed water without blocking weep openings. | Sealant remover, scraper, solvent suitable for the substrate, backer material where needed, exterior-grade compatible sealant. | Low to Medium | 1–2 hours, plus curing time | Perform a controlled water test after the sealant has cured according to the product instructions. |
| Worn weatherstripping | Drafts, light gaps, or water spray appear around the door perimeter when the door is closed. | Compressed, torn, shrunken, brittle, or incorrectly fitted gaskets. | Replace the gasket with a compatible profile, ensure continuous contact at the corners, and adjust the latch or hinges if compression is uneven. | Compatible replacement gasket, scissors or cutting tool, cleaning solution, adjustment tools. | Low to Medium | 1–3 hours | Close the door on a sheet of paper at several points; consistent resistance indicates more uniform gasket compression. |
| Missing or damaged head flashing | Water stains appear above the door or runs down behind the aluminum frame after wind-driven rain. | No projecting head flashing, damaged flashing, or an incorrectly integrated weather-resistive barrier. | Inspect the wall assembly, install or repair head flashing with end dams where appropriate, and integrate it with the surrounding drainage plane. | Metal or membrane flashing, compatible flashing tape, sealant, fasteners, replacement trim. | High | 4–8 hours or longer | Test the upper wall and door perimeter separately to confirm that water is not entering from above. |
| Perimeter frame joint failure | Water is visible at the jamb, corner, or frame-to-wall connection rather than in the sill channel. | Cracked sealant, movement between materials, poor surface preparation, or gaps around fasteners. | Remove failed sealant, clean and dry all surfaces, repair the joint, and maintain a planned drainage route instead of sealing every opening indiscriminately. | Exterior-grade sealant, backer material, primer if required, cleaning supplies, masking tape. | Medium | 2–4 hours, plus curing time | Use a staged hose test from the lowest section upward to identify the exact entry point. |
| Incorrect exterior grading | Pooled water remains against the threshold or flows toward the door from paving, decking, or a landing. | Insufficient fall away from the opening, blocked surface drainage, or a raised exterior finish. | Improve the exterior fall, clear nearby drains, add a suitable channel drain where needed, and keep the threshold above surrounding finished surfaces. | Level, drainage channel, grate, paving or deck materials, shims, and compatible sealant. | Medium to High | 4 hours to several days | Observe water movement during a controlled test and confirm that no standing water remains at the threshold. |
| Corrosion or physical damage | Pitting, distorted sill sections, enlarged fastener holes, or persistent leakage despite cleaning and resealing. | Long-term moisture exposure, galvanic contact, impact, or movement that has deformed the drainage profile. | Replace the affected frame or threshold component when the drainage geometry is compromised; repair surrounding water-management layers at the same time. | Matching aluminum component, corrosion-resistant fasteners, isolating materials, flashing, compatible sealant. | High | Half a day to several days | Inspect the repaired assembly and repeat a staged water test after all components are secured. |
After repairing an aluminum entry door, do not trust a dry frame. Water may travel behind the trim before appearing indoors. I use a low-pressure hose test, starting at the sill and moving upward. Each area receives water for several minutes. A dry paper towel around the corners reveals small seepage. The test must imitate rain, not a pressure washer. Too much force creates a false failure.
During one repair, the leak seemed fixed, but the inner corner stayed damp. I had sealed the visible joint and missed a blocked drainage path. That mistake changed my inspection routine. I now check weep openings, sill slope, corner joints, and the transition between frame and wall. I also inspect flashing for gaps, lifted edges, or trapped debris. Small details matter.
Prevention begins with correct water management.
Keep the sill clear, maintain open drainage channels, and replace cracked sealant with compatible exterior-grade sealant. Do not seal over designed weep holes. An experienced Aluminum Entry Door Manufacturer can confirm suitable frame details, installation tolerances, and repair materials. Re-test after curing, then repeat the check during heavy rain. Record the date, weather, test areas, and findings. Honest records expose patterns, although they sometimes reveal that the first repair was incomplete.
When security requirements move beyond ordinary forced-entry protection, the choice between cast aluminum and explosion-resistant steel should be guided by tested performance—not appearance alone. FEMA’s safe-room guidance, including FEMA P-361, emphasizes that protected openings must be engineered as part of the complete structural system, with resistance to pressure, debris impact, and progressive failure. NFPA 80 likewise stresses that door assemblies must be properly tested, listed, installed, and maintained; a heavy door without verified hardware, frame, and anchorage cannot deliver dependable protection.
Cast aluminum offers corrosion resistance, dimensional stability, and a refined architectural finish, making it attractive for high-security entrances where appearance matters. However, steel generally provides greater mass and energy absorption for severe forced-entry and blast-loading conditions. A bulletproof and explosion-resistant cast aluminum steel security entry door combines these advantages: a precision-cast aluminum exterior creates a premium façade, while the internal armored steel structure, reinforced frame, and blast-absorption system support resistance against ballistic impact, overpressure, and attack by tools.
For military facilities, government infrastructure, financial vaults, embassy residences, and high-risk private properties, the most meaningful specifications are independently verified ballistic ratings, pressure-performance data, impact testing, anchorage details, and compatibility with NFPA-compliant life-safety requirements. This integrated approach transforms the entrance from a decorative barrier into a coordinated protective assembly engineered for extreme security environments.
: Watch for damp corners, dark stains, swollen flooring, or a cold draft near the threshold. Small signs matter.
Dust, leaves, and construction debris can block the drainage path. Water then collects inside and moves behind the frame.
Flattened, cracked, or loose seals cannot maintain contact with the door panel. Wind-driven rain may enter through small openings.
Inspect the frame joints, threshold, sealant, fasteners, and drainage slots. Look for fresh water marks or darkened materials.
Clean the channel with mild soap and a soft brush. Measure the old strip carefully before selecting a replacement.
Stretched rubber may shrink later and reopen the leak. Keep each strip relaxed and press it evenly into the channel.
Not always. Extra sealant may hide the visible crack while trapping moisture behind the joint. The drainage problem can remain.
Remove loose sealant, clean the aluminum, and let it dry completely. Apply compatible exterior sealant without blocking drainage openings.
Use a gentle spray from the lower area upward. Avoid spraying directly into drainage holes or using excessive water pressure.
Seek assessment when leakage continues after seal replacement and sealing. Misaligned frames, hidden joints, or threshold problems may be involved.
Fixing only the visible crack is a common mistake. I once did that, and water returned through a hidden joint.
Allow the sealant to cure according to its instructions before heavy rain. Recheck it after temperature changes and another rainfall.
Aluminum Door Water Leakage Repair begins with identifying how and where water enters. Common warning signs include damp flooring, stained frames, peeling finishes, musty odors, and visible gaps around the door. Inspect the perimeter, corners, threshold, drainage openings, and fastener points during or after rainfall. Check whether seals, gaskets, and weatherstripping have become cracked, compressed, loose, or brittle, as these parts often allow water to pass through.
Effective repairs may include replacing worn sealing materials, applying suitable sealant to door-frame joints and fastener holes, and correcting damaged or blocked drainage channels. The threshold and flashing should also be checked for improper slope, gaps, or movement that could direct water indoors. After completing the work, test the door with a controlled spray of water, beginning at the lower areas and moving upward. Keeping drainage paths clear, inspecting seals regularly, and repairing small gaps early can help prevent future leaks and extend the door’s service life.